Note: This website contains almost no TokiMemo content.
In fact, this picture is the only reference at this point.
Self-hosting part 3: Setting up UnraidPost 00011 | August 5nd, 2022Welcome to the third part of the series. Last time we weighed the different options there are when it comes to building a home server. This time I will be setting up Unraid on the ThinkCentre I introduced last time. Strap yourself in; This is going to be a long one! The operating system I'm planning on using on the server is called Unraid. It's a pretty versatile piece of kit. It runs from a USB flash drive on pretty much any PC made in the last 15 years. It's great for beginners as it's user friendly and with its unique approach to storage, it makes adding more storage a breeze. Before getting started, I should point out that Unraid is a paid OS. It does however come with a 30 day free trial if you want to try it out. If you don't feel like spending more than necessary, there are other options such as TrueNAS. Please drop me a comment in the guestbook if you want me to try it out. What we need to get started:
So what's Unraid's "unique approach to storage"? To avoid losing data, normal redundant raid setups store two (or more) copies of your data. This means you'll need at least 2 TB of storage to store 1 TB of data. While this works, it's not very efficient. Unraid arrays work differently. All data is binary - It's either a 1 or a 0. An Unraid array consist of disk drives and parity drives. The disk drives is where your data gets stored. Unraid then reads every bit of data - one bit at a time on each data disk - and adds it up. The result will either be an even or uneven number. Being either even or uneven is in itself a binary value. This value gets stored on the parity drive. In case of a disk failure or replacement, Unraid can read the content of the parity drive and calculate what the value on the missing drive was. I have made a spreadsheet to easier visualise how it works. This approach has a few advantages. While traditional RAID requires your disks to be the same size, Unraid doesn't care as long as your disks are the same size or smaller than your parity drive. It's also a lot easier to add new disks. When you add a new disk, Unraid fills it with 0 values, meaning the values on the parity drive will be the same. Downloading and installing Unraid:Get the latest version of from their website. Open the downloaded zip file and copy its contents to the root of your USB drive. When it has finished copying, you need to run the make_bootable file designed for OS you're using (for Windows it's the .bat file). Eject the drive and plug it into the PC you'll be using as your server and turn it on. Unraid should boot automatically. If it doesn't, you will have to go into your PC's BIOS (usually achieved by smashing the delete key repeatedly while turning your PC on) and set USB drives to have first boot priority. Also, you might need to turn off Secure Boot (it is more of a Windows thing). 
You'll know Unraid has finished booting when all the text stops scrolling. It should list an IP address (most likely something like 192.168...). Type this IP address into a web browser on another computer on your network. Don't worry; This address is a local IP address, meaning it can only be accessed on your local network - not via the Internet. Congratulations you are now running Unraid!  
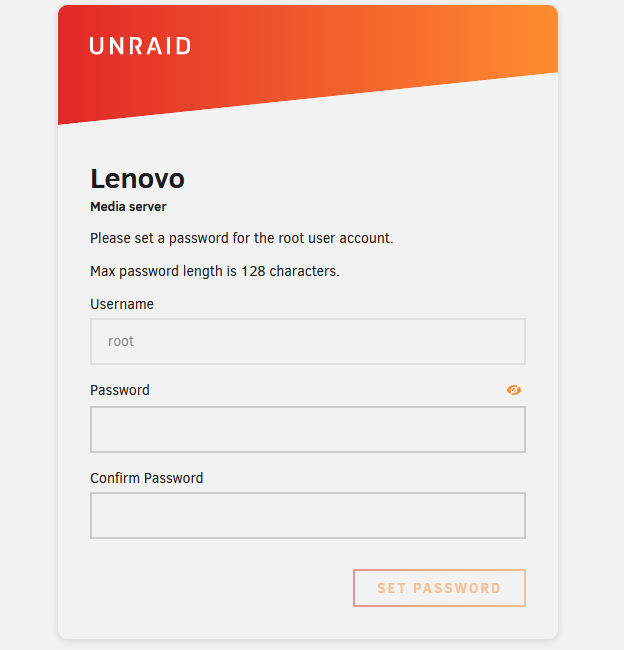
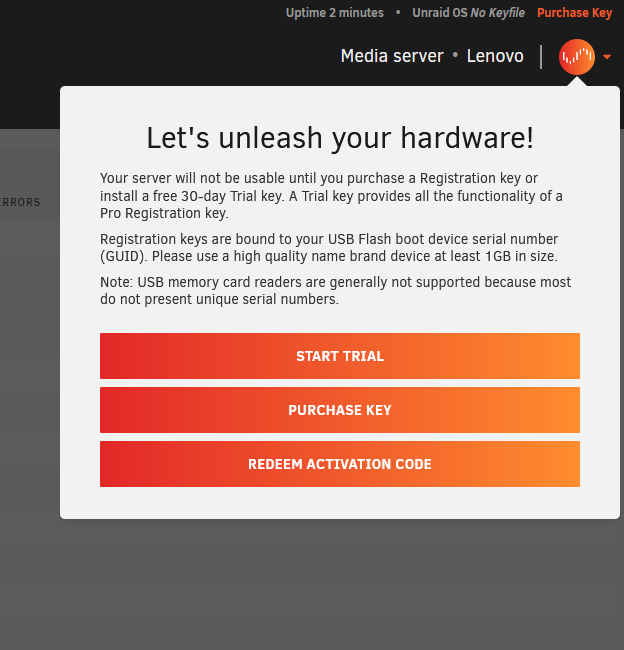
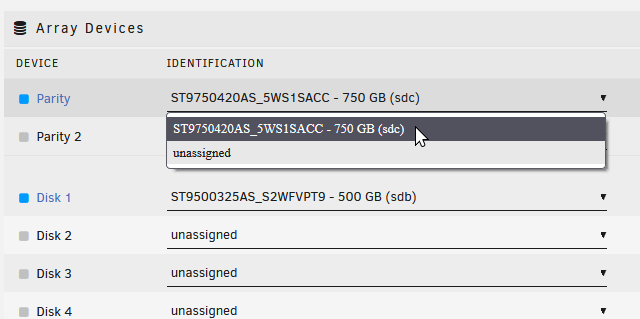
Upon opening the website, you'll be greeted with a prompt asking you to set a password for the root user. The root user is the main administrator account on the PC. Whoever has the root password has access to pretty much everything, so make sure to pick a strong password. After setting the password, you'll end up on the main screen. A pop-up will ask you if you want to start a trial or purchase a key. Other than a 30 day limit, the trial has no limitations so you might as well pick that and wait with getting your credit card out until you know it works as intended. Finally, you are asked if you want to install the "My Servers" plug-in. It's a free service from Unraid that allows you to access your server remotely. While it sounds convenient, it is not something I am planning on using. Feel free to install the plug-in or click "no thanks" no decline.  Setting up drives:Now it's time to configure the server. First we'll be wanting to set up the disk array. Pick your hard drives from the list on your servers main webpage.  Rules of thumb:
I have two disks attached: a 750 GB and a 500 GB hard drive. I'll set the 750 GB as the parity drive and the 500 as my data disk. This will leave me with 500 GB available for storage. This isn't much, but good enough for getting started. I can always upgrade once I find a good offer on hard drives. Click the Start button in the bottom of the page when you've assigned all your drives. Unraid will warn you that your parity disk will be wiped; Click proceed to start the parity sync. The parity sync is when Unraid calculates the sum of all binary values to check if they are even or not. (see the previous description of Unraid works for more info). 
Next, the data drives. If your drives aren't already formatted for Linux, you will need to format them. To do this, Tick the checkbox at "Yes, I want to do this" and click Format. Bear in mind this will erase all data on the disks. Setting up shares and users:Right, that's the disk setup sorted! As soon as the parity-sync is complete, you will have redundant network storage. While we wait for it to finish, let's set up some shares and users. We'll start with shares. A share is basically where you store your stuff. Click the "Shares" tab on the top of the page and click "Add Share". You'll be asked for a name. For the sake of simplicity, I named my share "share". Click "Add Share" when you are done. Stay on the page while the share gets created. When it's done, a new section called "SMB Security Settings" appear. There are a few settings we need to set here:
I set my share to Export: Yes and Security: Private. Click Apply. If you want, you can add more shares. If you have multiple members in your household, you can create their own private share or, if you have a Mac you can create a share for Time Machine backups. Remember to set Export and Security settings for all shares you create! Once you've created all the shares you want, its time to add some users. Click the "Users" tab on the top of the server's webpage and click "Add User". Give the user a name and a password. A password isn't required per se, but seeing you'll be using this account to access your data, you might want to pick one anyway. In any case, click Add when you're done. You can add more users if you need to. Once you've added all the users you want, we need to set up who can access which shares. Click the Shares tab again and pick one of the shares you created. Under "SMB User Access" you'll now find a list of the users you've created. Seeing I set my share to be private, nobody has access by default. To grant users access, select "Read/Write" or "Read-only" and click Apply. Congratulations, you have now successfully set up a home server! Accessing the share:While the process for accessing your server varies depending on your operating system, it is pretty simple: Windows: Press Win+R to open up a run window. Enter \\tower\share with "share" being the name of the share - replace it if you gave your share another name. Enter your username and password when prompted. Mac (I don't have a Mac nearby at the moment, so I'll have to do this from memory): Open Finder and press ⌘+K to open the Connect to Server window. Type smb://tower/share under server address and click Connect. You'll be prompted for your username and password. Why "Tower", you ask? Tower is the default name Unraid gives your server. You can change it under Settings → Identification as soon as the parity sync is completed. Next time I'm planning to go through the settings and tools panes to point out other options you might want to change. |