Note: This website contains almost no TokiMemo content.
In fact, this picture is the only reference at this point.
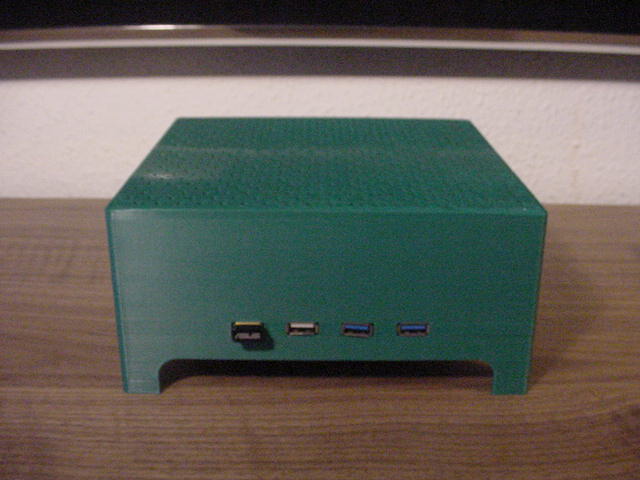
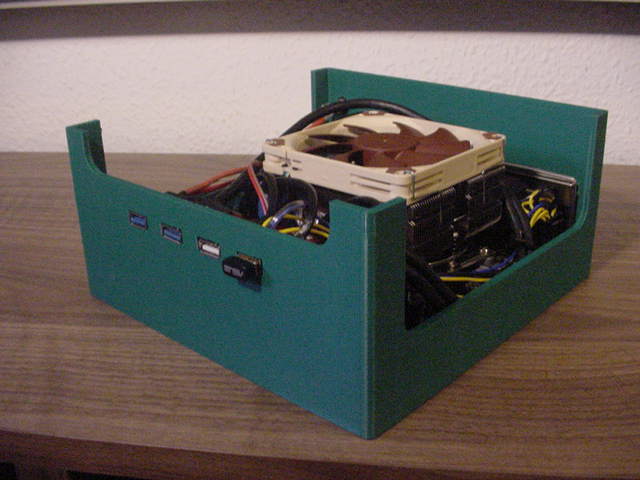
TV Setup complete (almost)Post 00029 | January 1st 2023 Happy new year everyone! Man, does it feel good being able to just lean back with some video games again! This new TV turned into quite the project. I used to have a homemade piece of furniture that had room for both a tube and a flat panel TV. It was an open design, meaning it had no back or side panels, which was great for airflow, but oh sweet Jesus were the cables an eyesore. This is also part of the reason why I bought the Beovision; It has its surround module built in, meaning I no longer have any need for a bulky AV receiver and all the cables that entails. With the AV receiver and big speakers gone, the bespoke furniture didn't make much sense so I decided to replace that as well. I didn't feel like dealing with a ton of sawdust again, so this time I went for something store-bought. After some deliberation, I went with an Ikea Stockholm. I like the walnut veneer and from the measurements from the website it looked like it would be able to fit everything. What I hadn't taken into account was the doors; They flip up into the console, which while it looks cool, it takes up quite a bit of space inside. In the end, I wasn't able to fit my first generation Xbox or the PC case I'd 3D printed in post 00017. It was only like a centimetre too tall as well! In the end I decided to design a new case, and this time it was the simplest thing I could come up with:
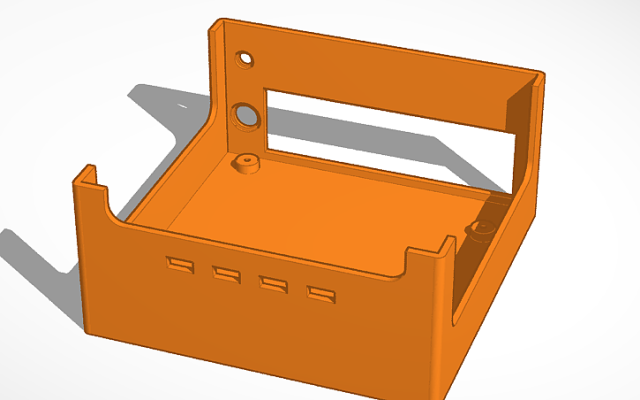
This case follows the "fuck it, that'll do" school of thought. The case is a single piece, requiring the motherboard to be mounted upside down. This way it won't look like the case is missing a lid, and I assume this will be better for airflow (heat travels upwards so a fan sucking in air from underneath would be better, right?). I made a 3 mm hole for a power LED which I didn't end up using as the Pico-PSU has a built in LED. Other than that, there are big cutouts on each side to save on filament and to help with air intake. The top features a star-shaped mesh. I like the look of it, but it took like ten hours to print the bottom alone. All in all, I'm pleased with the design. If you ignore the star mesh, it's a pretty fast print, is practical, and doesn't waste a lot of filament. The only supports are from the I/O bracket, USB ports, and the holes for the power button and plug. Here's an .stl file of the case if you want to make your own. It is the model sans stars as I must have forgotten to save after adding the stars.
The rest of the setupEverything else fit though! I was able to fit eleven consoles, a PC and an Nvidia Shield (the SNES and the Switch are placed on top of the cabinet). The space I originally dedicated to the original Xbox will instead function as a placeholder spot - It's big enough to fit a Slim PS3, a PS4 or an Xbox One X. That way, I can hook either up whenever I want to play something from their libraries. Seeing they all use the same video and power connector, it's a fairly trivial task hooking them up. Pretty much all my connected consoles have flash carts or ODEs installed. This means I rarely need to change a disc or cartridge, which saves a lot of space. There is enough slack in the cables though, so if needed, I am able to pull out the console to change a game. The SD card on a N64 Everdrive adds just enough height to make it not fit. I was able to make it fit by using a MacBook Air micro SD card adapter (It's like any other Micro SD card adapter, but a bit smaller, to make it flush with a MacBook Air) - Using this, I am able to hide the card inside the cartridge, making it fit on the shelf. GameCube with GBA adapter and Mega Drive with MegaSD are also too tall to fit on any of the pre-drilled shelf heights. Not wanting to drill new holes in my new furniture, I 3D printed some stand-offs. CablingIts easy to make everything look nice with everything in place. However, it usually starts going downhill as soon as you start connecting cables. To hide them away as neatly as possible, I decided to utilise the bottom of the cabinet to its fullest potential. Using industrial strength velcro, I attached the SCART switch as well as most power cabling. Instead of using power strips, I opted to use ESP32-based relay boards flashed with Tasmota meaning I can turn everything on and off over wifi. In conclusion, while being annoyed with the size constraints at first, I have ended up being pretty happy with this setup. If you squint you can still spot a few cables under the cabinet, but I'd argue it is well within the realm of acceptability. Being able to turn everything on without getting out of the sofa is also a boon - Especially when you use flash carts, as you are able to switch games. The rest of the checklistWhile the setup is good enough to use as is, I still have a few things I want to add when I get around to it: Firstly, I'd like to add an NFC tags to my controllers; This way I'd be able to turn on my TV and console just by waving the controller in front of an NFC reader, Amiibo style. Secondly, the cabling for the relay boards could be better. Everything is being held together with Wago clamps. My reasoning behind this is that it would be easier to service, but to be honest, it's a mess and I dread the day I need to service it. Instead, I designed a little PCB via EasyEDA. It only cost about €5 for as many PCBs. It does the same job as my Wago spaghetti, only more 2D. Lastly, I notice the manual for the Beovision mentions an HDMI matrix; I might add one of those to the mix when I figure out how to integrate it. That would definitely make capturing footage a lot more convenient, although my current approach with HDMI splitters works just as well.
|


